Official Luthiers Forum! http://www-.luthiersforum.com/forum/ |
|
Sanding the neck cheeks http://www-.luthiersforum.com/forum/viewtopic.php?f=10102&t=2093 |
Page 1 of 2 |
Author: | Colby Horton [ Sun Jun 05, 2005 12:31 am ] |
Post subject: | |
I’ve been using the method in the Cumpiano/Natelson book since I started building. After the fingerboard is fretted and glued to the neckshaft you use a chisel and a sanding block to make the neck cheeks lay perfectly on the guitar. I just can’t seem to get it as neat as I would like. I’ve also heard of holding the neckshaft in place on the guitar before the fingerboard is glued on and pulling a piece of sandpaper under the bearing surface, but I didn’t get good results with this either. Does the neck tenon need to slide freely? Mine was quite snug. It seemed the sandpaper kept jamming. By the way I am using a mortise & tenon bolt on type joint. Any info on how YOU do this would be greatly appreciated. |
Author: | Bobc [ Sun Jun 05, 2005 1:09 am ] |
Post subject: | |
Colby try undercutting the checks so that they are high on the outside edges and taper towards the tenon using a sharp chisel. It doen't have to be much. Then when you pull the sandpaper thru it will only sand the outer edges that touch the body. Don't forget the bottom edge. |
Author: | LanceK [ Sun Jun 05, 2005 1:23 am ] |
Post subject: | |
Colby, one thing you want to do, is relieve the bearing surface by chistling out all but maybe 1/8th" from the edge. So when you (floss) with sand paper you only having to remove wood from the parameter of the cheeks instead of the whole thing. I made this mistake on my first 2 guitars and had a heck of a time getting a perfectly tight fit. Then after learning this little trick, all my fits have been dead on tight. Lance |
Author: | Rick Davis [ Sun Jun 05, 2005 1:42 am ] |
Post subject: | |
Why wait until after the fingerboard is glued on? It's much easier to rough out the heel, do the neck fitting, and then attach the fingerboard. |
Author: | crazymanmichael [ Sun Jun 05, 2005 1:49 am ] |
Post subject: | |
in conjuction with the undercutting of the cheeks detailed above, another thing that makes the operation easier is to not use sandpaper. rather, get some of the stikit gold mylar film abrasive. remove the adhesive from the back with naphta. the mylar film slides ever so much easier, and is much stronger so it won't tear. there was a thread here a while back on where to get it. it is expensive($38 a roll was about the cheapest i saw), but it is infinitely superior for the job. i think you might try here: http://autobodystore.net/Merchant2/merchant.mvc?Screen=PROD& Product_Code=3M3rs&Category_Code=SM another thing is don't clamp the abrasive between the neck and body. you only want a light pressure. take your time and don't try to hurry. put on some good tunes, relax and enjoy completing one of the oh so simple details that sets apart the good work. |
Author: | Paul Schulte [ Sun Jun 05, 2005 3:00 am ] |
Post subject: | |
What BobC and lance said. Taper the cheeks in towards the tenon and leave the "outside" or bearing part of the cheeks a little proud. The trick is you are also setting the neck angle at the same time and trying to keep the fretboard aligned with the centerline of the body AND fitting the bearing surface to the sides. I use a flat block of wood about 1"x1"x3.5" with sandpaper stuck to one of the 1" surfaces. I sand along the bearing surface with the block in even unidirectional strokes of the block. If you have done everything correctly you usually wind up favoring the bottom of the heel a bit on both sides of the tenon to get the right backset. Sounds complicated but just takes a bit of patience. keep fitting the neck checking the backset,fretboard to body centerline, and flushness of the joint. You can do it. |
Author: | Paul Schulte [ Sun Jun 05, 2005 3:14 am ] |
Post subject: | |
I've found that it is much easier to fit and glue the endcap on the heel AFTER the neck has been fitted, whereas C+N do it before hand. The heel cap will tend to get "notches" sanded into them due to the inward taper of the cheeks. |
Author: | crazymanmichael [ Sun Jun 05, 2005 4:00 am ] |
Post subject: | |
right about that paul. one of the hazards of repair work when resetting necks. i also do not glue the fretboard down until i am satisfied with my set and fit. i feel it would just add to the risk and complexity of the task. i do the glue up of the neck and fb extension at the same time. but this sequence is a carry over from repair work(neck resets) which i did long before i starting building. |
Author: | JJ Donohue [ Sun Jun 05, 2005 4:40 am ] |
Post subject: | |
Great thread...and good advice. Colby asked about the fit between the mortise & tenon fit but the question wasn't really addressed. How critical is this fit? What are problems created by a joint that is too tight or too loose? What's to be considered "just right"? Another question: When routing out the tenon is it better to rout it square or to jig it so that it routs a 1* to 2* angle on the cheeks? What do most of you guys do and why? |
Author: | crazymanmichael [ Sun Jun 05, 2005 5:37 am ] |
Post subject: | |
my mortise and tenon is of the dovetail persuasion rather than the straight, squared off sort, but i don't think it varies much from one to the other. the joint should be a snug but smooth sliding fit. it should not have to be forced into position, but neither should there be slop from side to side. if it has to be forced you run the risk of a split neck block sooner or later. if too loose trying to align it will be a bear. jj, i am interpreting your question to be about the angle the cheeks make to the fingerboard surface of the neck to achieve the desired neck set. when i route the tenon i jig the neck to the design angle. for instance i have a gibson j45 in for a new neck. if i can't get a new factory neck(as i am not an 'authorized' gibson repairer they won't sell directly to me), i will have to make the neck. their stated design angle is a whopping 3 degrees, so the neck will be jigged and routed for that angle. |
Author: | Pwoolson [ Sun Jun 05, 2005 6:24 am ] |
Post subject: | |
JJ, to aribitrarily pick a number ( 1 1/2? or 2?) is giving yourself a lot of extra headaches in the future. You need to devise a way so that the tennon is cut to the angle of the body it is being fit to. There are several different ideas out there. If you want, I can take some pics of mine and try to explain it to you. Paul S. was spot on when he said that you need to watch the various angles. I go so far as to count my pull strokes. 10 on the left, ten on the right, 5 in the middle of the heal. check all the alignment. do it again. It's slow and tedious but you don't want to find out after you have lacquer and a bridge on that you have neck angle problems. (don't ask me how I know this) |
Author: | JJ Donohue [ Sun Jun 05, 2005 6:41 am ] |
Post subject: | |
Thanks Michael...we're talking about the same angle. On the clearance issue of the neck to neck block, I can understand the need to have a tight fit on a dovetail since the mating surfaces are actually glued and you wouldn't want to have a gap. But with the M&T, assuming the threaded inserts and bolt holes are on the same centerline with the center of the bridge, alignment should not be a problem. Ideally, with the M&T it seems that we would want to have all mating surfaces fitting tightly in order to insure transferring the maximun vibrational energy between the neck and the body. Under this assumption, the following issues come in to play: 1) The end grain surface of the tenon should bottom out precicely to the bottom of the mortise...and to do this, they must have identical angles. 2) The sides of the tenon should also tightly fit and mate perfectly with the sides of the mortise. While I realize that when the bolts are tightened up, the cheeks snug up to the body. My questions: 1) Does this really provide enough coupling? 2) Does anyone trim or shim the M&T surfaces to maximize the coupling contact at the other surfaces? My joinery in this area needs a lot of improvement if I'm going to reach the precision of the ideal and I was interested in knowing how others approach this...TIA |
Author: | JJ Donohue [ Sun Jun 05, 2005 6:51 am ] |
Post subject: | |
Thanks Paul...any photos and advice are greatly appreciated. |
Author: | crazymanmichael [ Sun Jun 05, 2005 7:48 am ] |
Post subject: | |
taylor used bolt on necks for a couple of decades with out a mortice and tenon of any sort, and produced good tone. "dove tail" necks are just a specific form of mortice and tenon. dovetail mortice and tenons have produced good tone in a variety of instruments for centuries without the endgrain on the neck meeting up with the bottom of the neck block motice. there is no practical reason why it should do so. if you do not have a snug fit of the tenon into the mortice then the mortice and tenon is not providing any useful structural function and can be readily dispensed with as superfluous. one does not arbitrarily pick an angle to cut to. the angle is a function of the design parameters to which one should be building. to suggest that one should be attempting to fit a square cut neck to a neck set angle of 1-3 degrees by labouriously sanding it is a rather unique approach to my thinking. the sanding process should be for final fine tuning the set and ensuring that the cheek profile matches that of the side so there are no unsightly gaps. |
Author: | Don A [ Sun Jun 05, 2005 7:54 am ] |
Post subject: | |
JJ, this topic is probably beyond my experience. For bolt on systems the issue of vibration transmission is probably really a non-issue. Rick Turner, among others, has built guitars using an adjustable 3 bolt system. There is no contact of wood to wood whatsoever at the neck joint and I believe the fingerboard is also cantilevered over the body. However, I can see where the wood to wood joint may be more important for the dovetail joint if only from a structural consideration. Like usual, I'm prepared to be shot down. ![]() ![]() |
Author: | LanceK [ Sun Jun 05, 2005 8:01 am ] |
Post subject: | |
JJ, Mark Kett has a real nice jig that measures the angle at the neck (One the body) Then transfers that angle to the neck tenon cutting jig, so you cut the perfect back set to for each individual guitar. I should have mine shortly, ill give a full review. I just revived the Guitar Jigs Binding Cutter, ill give a review on that soon as I use it, which will be on the Ziricote Soft Cutaway I'm building, so it will be a nice challenge. |
Author: | crazymanmichael [ Sun Jun 05, 2005 8:53 am ] |
Post subject: | |
lance had a look at marks site as i didn't remember him offering such a jig and i did not see it. has he not offered it for sale as yet? |
Author: | JJ Donohue [ Sun Jun 05, 2005 10:06 am ] |
Post subject: | |
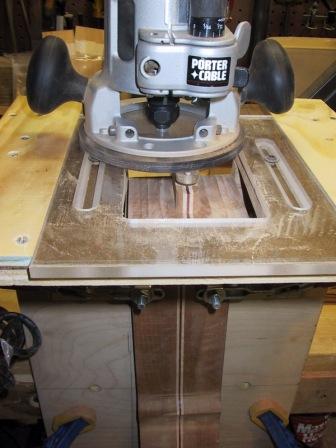
Sounds cool Lance but it seems like a T-bevel sliding square would be a cheap and accurate way of measuring and transferring the angle from the body to the neck. I'd go this route first since I already made a jig that's set for 1.5*. Here's a pic of what I use...it's a Stewmwc template on a jig that I made following their suggestions. I hold the neck blank in place with 2 Destaco clamps. Between the FB surface and the jig is a block positioned such that the angle is 1.5*. ![]() It seems that all I'd have to do is alter the thickness and/or location of the shim on my jig (which you can't see on the pic) to correspond with the transferred body angle. An even better way might be to hinge the jig so that the planes would have an angular adjustment. Or am I missing something? This jig stuff is rarified atmosphere for me. Any critique is appreciated. |
Author: | LanceK [ Sun Jun 05, 2005 11:07 am ] |
Post subject: | |
Michael, email Mark directly, or Stan Thomison, as he already has one. Mark has lots of jigs either in the prototype mode or fully developed, just not up on the website yet. |
Author: | Don A [ Sun Jun 05, 2005 12:42 pm ] |
Post subject: | |
[QUOTE=LanceK] Michael, email Mark directly, or Stan Thomison, as he already has one. Mark has lots of jigs either in the prototype mode or fully developed, just not up on the website yet.[/QUOTE] I keep checking his site but no new additions. I've heard of a couple of jigs I'm interested in but they must have been prototypes. Not fair for you and Stan to tease us ![]() ![]() |
Author: | McCollum [ Sun Jun 05, 2005 3:25 pm ] |
Post subject: | |
Okay guys. Theoretical neck angles are great starting points. My dovetail jig is set at 1.5 degrees backset. But that's only a starting place. Depending upon humidity, how much drop off you have in the front of the top of the guitar, the heighth of your bridge and how much radius you put in the front cross brace. AND, the final one, if your front neck block is actually square to the top. I find that maybe one in five necks goes fast and is close. All the rest need adjustments here and there. And then there is the question: can you get it right before lacquering. Yes. Then you sand the lacquer and polish and the joint doesn't fit again becasue you have sanded a little too much lacquer in a certain area. Getting good at this is a learned trait. I mean you have to do a lot of neck sets before it gets comfortable. And then, just when you think you've got it, along comes the problem child neck. And you can't figure out why it doesn't work. So no, it never gets easy. But it's never boring! I've built over 260 guitars and done at least 100 neck resets and I'm still sometimes confused. Good luck trying to build a jig to make it perfect every time. But if you do, I'll pay you a lot of money for one :) Lance |
Author: | tippie53 [ Sun Jun 05, 2005 10:17 pm ] |
Post subject: | |
The neck joint is one of the most misunderstood parts of the guitar. From an engineering standpoint it is simply a point where 2 parts are connected. The dovetail is the traditional joint as when glues were not as strong as they are today the builder needed the chemical bond and mechanical bond to make the joint work. The M&T sometimes called a bolt on is a simple joint that actuall is still a glued joint. The necl angle on most guitars will range from 1-3 degrees. Martin uses a 1 1/2 degree. You need to establish what angle you will use. Here is where molds willl help to establish a constant angle for the buider over free building as the neck block is secured when the top and backs are glued. To establish the angle you need to know where the saddle is and how to get the proper postion of the action in relation to that point. A straight edge and sliding bevel will help for that. The true bolt on is just that , it relys on the mechanical hold of the bolts and only bolts. All 3 joints are acceptable but most builders have a preference. Again this tends to be a religion politics point of view. I agree with Rick Davis as to do a pre set with the neck alone before the fingerboard is glued on. I stopped using chisels years ago and use a little sandpaper jig. I can set a neck in 10 to 15 minutes with this and not tear out wood and have very clean corners . I do use chalk to mark the area and see the contact points. Small bites make big changes so work slow. As for the neck I don't think it really effects the sound that much. The neck joint once frozen is moot. I am more concerned with nut material and bridge and saddle mechanics. Here is where the energy is transmited to the top. The neck at most is a secondary influence and that is slight. I agree some people think they can hear a difference but I can't. Rememeber this is a box with strings. the mechanics and enginerring are basics. It is the art of building and this is somthing that can't be quantified that makes our guitars different. Have fun with it after all that is what it is all about. The fun of building then the joy of playing john hall |
Author: | Colby Horton [ Mon Jun 06, 2005 12:35 am ] |
Post subject: | |
Thanks for all the info guys! I can’t tell you how much I appreciate it. |
Author: | Brock Poling [ Mon Jun 06, 2005 2:23 am ] |
Post subject: | |
You should get Paul Woolson to post a couple of pics of his jig (I have one too, but my shop looks like a tornado tore through it recently). It is basically the stewmac design, with a couple of cool modifications, the board that the neck is attached too is adjustable so you can modify the angle of the neck in reference to the cutting template. A straight edge protrudes through the top of the jig from the angled board below. By setting the body in front of this "protruding straight edge" you can dial in the right angle before routing the tenon. I know this isn't a very good description. This is one of those situations where a picture is worth 1000 words. It is my understanding that this is a modification of Charles Fox's set up. It took me a little time to get it figured out... and I made a little fire wood in the process... but I will tell you that now I have it down it works really slick. If Paul can't scrounge up a picture I can shoot a couple tonight.... but my shop is a mess. |
Author: | Don A [ Mon Jun 06, 2005 3:33 am ] |
Post subject: | |
Paul and/or Brock, I'd really like to see some pictures of your jigs. TIA. |
Page 1 of 2 | All times are UTC - 5 hours |
Powered by phpBB® Forum Software © phpBB Group http://www.phpbb.com/ |